


There’s nothing that makes boat owners more nervous than a
bad seam. If you want to take care of your boat—and ensure yourself the peace
of mind that comes from a well-maintained boat—than there’s one essential skill
you need to learn: caulking boat seams. If you’re not an experienced caulker,
the process can be a little intimidating. That’s why we’ve broken it down into
its individual steps. We hope this guide is helpful!
Step One: Remove Old
Seam & Any Residue
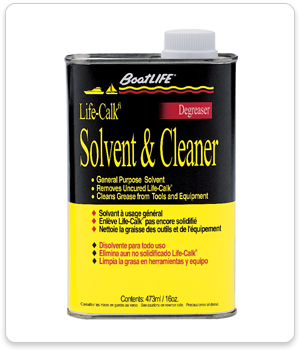
Getting a clean seam for a fresh caulking job means getting
rid of anything that might get in the way. Boating
Magazine recommends “reefing” the seam first, which means removing existing
beads of caulk with a reefing tool or hook. Once removed, you should also
consider using a solvent like Life-Calk®
Solvent & Cleaner to clear the area for a proper caulking seal. Because
this solvent is also great as a general solvent, you won’t have to worry
about investing in a product you’ll never use again.
Step Two: Tape Off The
Borders
If you’ve ever applied painter’s tape to areas in your home
before painting, then you know the idea here. You want to apply masking tape to
those areas around the seam you don’t
want to get any caulk on. That means applying the proper masking tape to either
side of the seam you’re about to work on. Don’t be afraid to take your time
here—if you apply it carefully, the entire process will go much more smoothly
by the end.
Step Three: Align The
Nozzle Tip
Just as a baker wouldn’t decorate a cake without the right piping
tips, caulking boat seams properly requires the right kind of nozzle tip when
you start the application. We recommend using a 45-degree cut to create an
oval. This allows you to get more caulking into the seam to create a more
comprehensive seal.
Step Four: Apply
Applying the caulk can sometimes feel more like an art than
a science, but here are a few tips for creating more consistent results:
- Aim for
consistency. A consistent speed ensures proper coverage. Although you might
see varying advice for pushing or pulling the applicator, you should apply the caulk by pushing the caulking gun to avoid air pockets. - Take your
time. There’s no race here! Your goal should be an effective caulking
application, not the world record for world’s fastest boat seam caulker!
boat
Step Five: Smooth
Things Out
Caulking boat seams doesn’t have to be rocket science. By
paying attention to the tips above and using our caulking supplies here
at BoatLIFE, you’ll find the entire process can be much simpler than you ever
imagined.After the caulk is applied, you have some time to manipulate
it yet before the cure sets in. This is the time to smooth out the caulk. Use a
protected (gloved) finger or a product such as Super Slick Sealant Smoother, or a specific tool designed to level off the caulk.
After this, you can remove the tape you applied earlier and let the cure set in!

